Lab 2 : Installation Mikrotik With GNS3
Assalamualaikum wr wb
Tujuan :
Purpose :
- Dapat memahami tentang Mikrotik
Can understand about Mikrotik
- Dapat mengetahui tentang cara install Mikrotik di GNS3
Can know about how to install Mikrotik in GNS3
Bahan :
Materials :
- Aplikasi GNS3
The application GNS3
- ISO Mikrotik
ISO Mikrotik
Konsep Dasar :
Basic Concepts :
Mikrotik adalah RouterOS (Router Operating System) yaitu sebuah sistem operasi router yang bisa menjalankan dan mengatur aktivitas network secara menyeluruh. Mulai dari management bandwidth, routing, billing hotspot, data user, load balancing, hingga routing BGP. Mikrotik didesain untuk mudah digunakan dan sangat baik digunakan untuk keperluan administrasi jaringan komputer seperti merancang dan membangun sebuah sistem jaringan komputer skala kecil hingga yang kompleks sekalipun.
Mikrotik is RouterOS (Router Operating System) is an operating system that can run the router and set the overall network activity. Start of bandwidth management, routing, billing hotspot, user data, load balancing, until the BGP routing. Mikrotik is designed to be easy to use and very well used for administrative purposes such as computer network design and build a small-scale computer network systems to complex ones.
Langkah-langkah :
Steps :
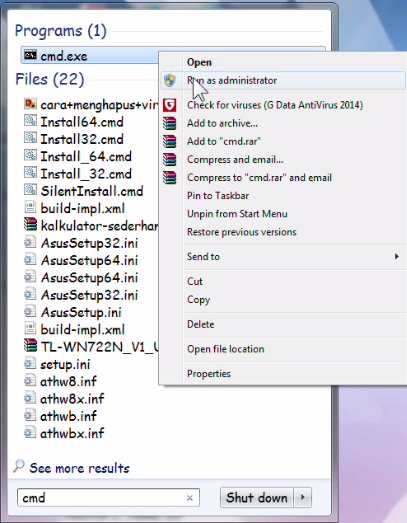
- Pertama-tama kita buka aplikasi CMD, dengan cara klik start lalu ketik cmd dan klik kanan pilih yang run as administrator
First we open the CMD application, by clicking start then type cmd and right click select run as administrator
- Selanjutnya kita harus masuk ke folder program files GNS3 dengan cara menggunakan perintah cd. Cara yang ini untuk GNS3 tipe 0.8.6
Next we have to go into program files folder GNS3 by using the cd command. This way for GNS3 type 0.8.6

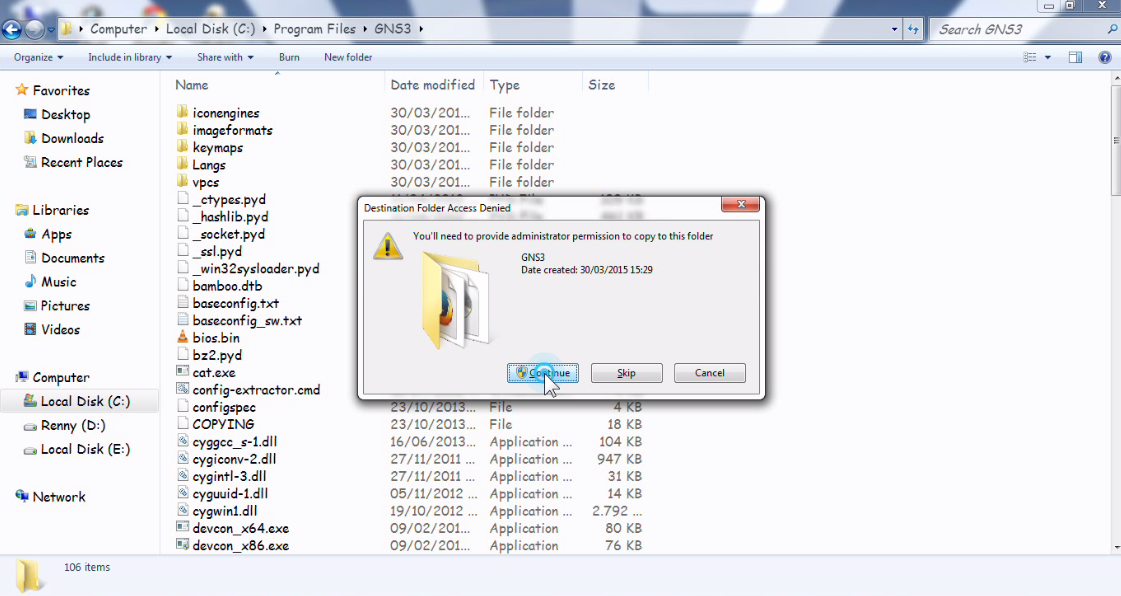
- Selanjutnya kita copy paste file iso mikrotik (versi bebas) kedalam folder program files GNS3
Next we copy paste Mikrotik iso file (free version) into the program files folder GNS3
- Ketikkan perintah qemu.exe mikrotik.img –boot d –cdrom “mikrotik-5.25.iso” untuk perintah “mikrotik-5.25.iso” itu sesuaikan dengan tipe file iso mikrotik yang anda gunakan.
Type the command qemu.exe Mikrotik.img Boot d -cdrom "Mikrotik-5.25.iso" to command "Mikrotik-5.25.iso" was adjusted with Mikrotik iso file type you use

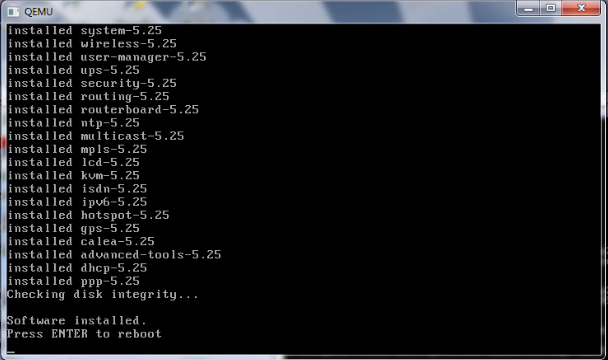
- Maka otomatis akan muncul tab baru, lalu tekan “A” untuk menandai semua menu yang ada (kalau ada menu yang tidak ingin diinstal tekan “space” pada keyboard), tekan “I” untuk menginstall menu yang udah diberi tanda, tekan “Y” dan “Y” untuk menyetujui penginstalan
Then a new tab will automatically appear, then press "A" to mark all existing menu (if there is a menu that does not want to install, press "space" on the keyboard), press "I" to install a menu that already marked, press "Y" and "Y" to accept installation

- Kalau proses instalasinya sudah selesai, ada tulisan press enter to reboot klik enter dan langsung di close tab QEMUnya kalau tidak nanti akan install lagi
When the installation process is complete, no writing press enter to reboot click enter and live in close tabs QEMU otherwise will be to install again
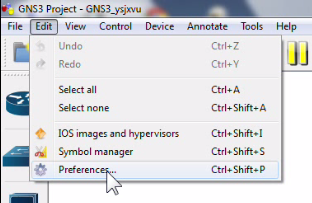
- Selanjutnya buka aplikasi GNS3, klik edit – preferences untuk menambahkan Mikrotik.img
Then open GNS3 application, click edit - preferences to add Mikrotik.img
- Pilih menu Qemu, klik tulisan test setting tunggu sampai muncul tulisan bewarna hijau
Select the menu Qemu, click on test setting wait until it says green colored

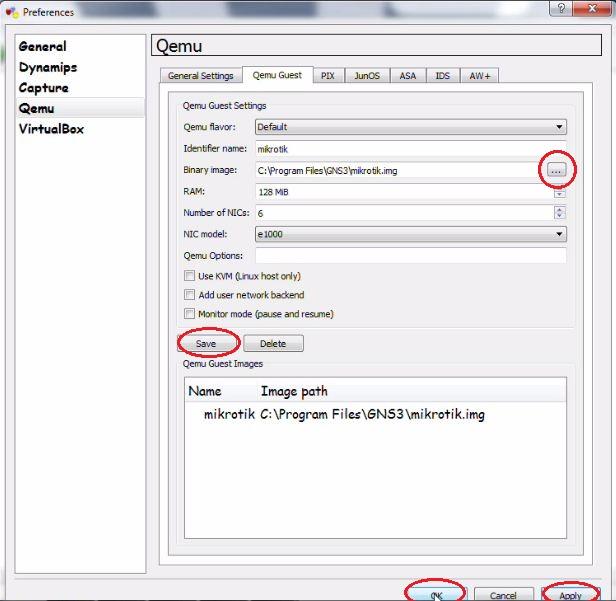
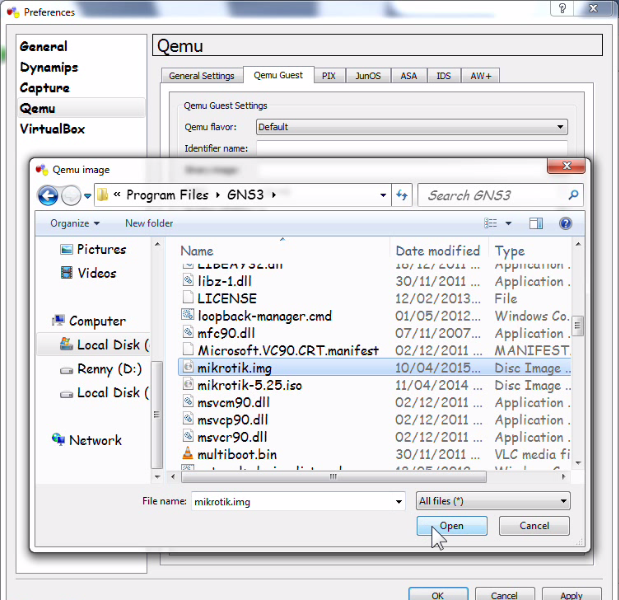
- Kemudian klik menu Qemu Guest, klik browse atau kotak yang titik-titik pada binary image. Cari mikrotik.img di program files GNS3 dan klik open. Setelah itu klik save – ok – aplly – ok
Then click menu Qemu Guest, click browse or box that points to the binary image. Find mikrotik.img in program files GNS3 and click Open. Then click save - ok - aplly - ok
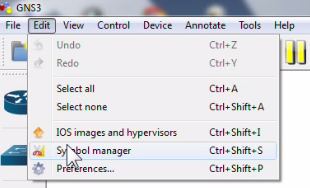
- Klik edit – symbol manager, untuk menambahkan simbol Mikrotik
Click edit - symbol manager, to add a symbol Mikrotik
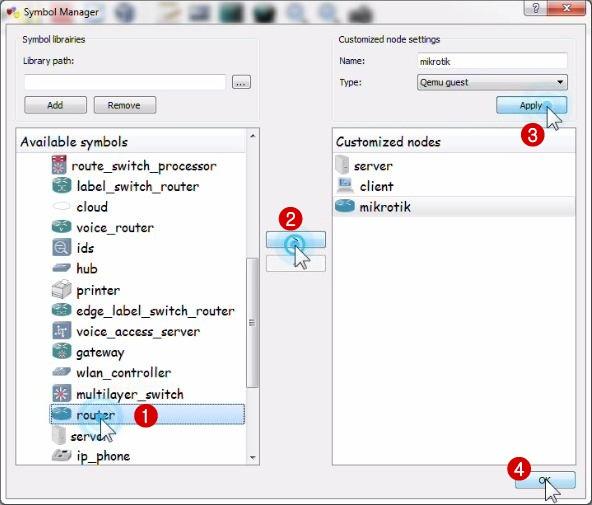
- Pertama pilih router, lalu klik tanda panah kekanan, ketik name jadi mikrotik dan typenya ganti jadi qemu guest, klik apply dan ok
First select the router, then click the arrow to right, type the name into Mikrotik and type of dressing so qemu guest, click apply and ok
- Pilih all devices, klik router mikrotik dan seret kesebelah kanan (yang blank document)
Select all devices, click Mikrotik router and drag it to the right (the blank document)
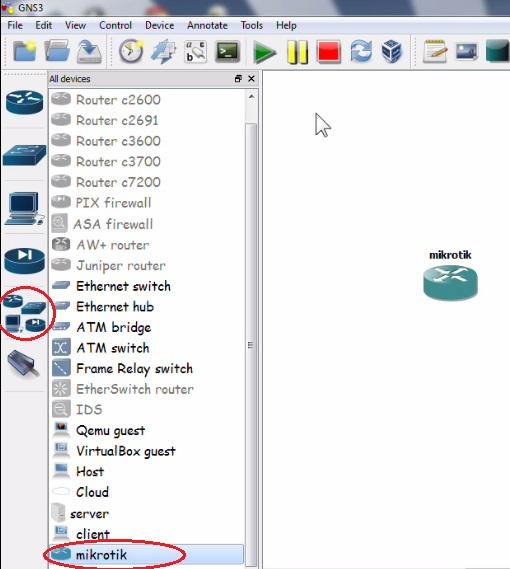
- Kemudian klik kanan router mikrotiknya pilih start
Then right click select start Mikrotik router

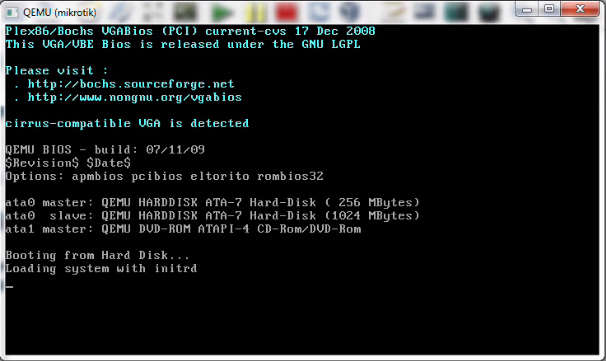
- Maka akan muncul tampilan seperti ini, tunggu sampai ada tulisan mikrotik login. Untuk loginnya harus sebagai “admin” dan “tanpa password”, langsung tekan enter
Then it will appear like this, wait until there is an inscription Mikrotik login. For must login as “admin” and “no password”, immediately press enter

Cukup sekian dan terima kasih
That's all and thank you
Mohon maaf bila ada penulisan
bahasa yang salah
Sorry if there
was writing the
incorrect language
Wassalamuaikum
wr wb